Aug 4, 2021
Get started with Apache Superset and PostgreSQL®
Find out how to use Apache Superset to create data visualizations from a PostgreSQL table in an Aiven environment - and use it to drive your business decisions.
Francesco Tisiot
|RSS FeedHead of Developer Experience at Aiven
Get started with Apache Superset and PostgreSQL
"A picture is worth a thousand words" is a common saying in many languages. Similarly, in the data world, a visualization condenses huge amounts of raw points into an image that can be used to create insightful stories driving business decisions. Several tools exist in the dataviz ecosystem, with Apache Superset getting a lot of traction for its open source status and the advanced list of features it offers for data exploration, visualization and sharing.
This blog post shows how to start creating amazing visualizations with Apache Superset building on an existing PostgreSQL table.
Get your PostgreSQL free plan today
Ready to dive deeper into PostgreSQL? Sign up for a free PostgreSQL plan and follow along.Run Apache Superset on Docker
Docker is a good friend here! It allows us to spin up - in a matter of minutes - complex software infrastructure without needing to understand and implement the setup manually. In cases like this when we're testing a new tool, it's a perfect fit!
We can start by cloning the Apache Superset GitHub repo, and navigating to the superset folder from our terminal:
git clone https://github.com/apache/superset.git
cd superset
Then we can use docker-compose to create all the containers needed for Apache Superset:
docker-compose -f docker-compose-non-dev.yml up
Boom! Our Apache Superset is ready with a nice set of pre-built content we can browse.
Now, let's go to localhost:8088 in our browser, and login with the safest duo ever (admin as user, and admin as password).
If you're curious, check out the Apache Superset docker page for more information.
Push the dataset to PostgreSQL
We've explored happiness before on the blog, and how to push Kaggle's related dataset to PostgreSQL via Python. You can use the output mentioned there for the current example, or use your own. The end result in our example is a PostgreSQL instance named demo-pg, containing a table called happiness with content similar to the one below:
survey_yr | country | overall_rank |  score  |  gdp   | generosity | freedom  | social_support | life_exp | gov_trust
----------+---------+--------------+---------+--------+------------+----------+----------------+----------+----------
       19 | Finland |            1 |  7.7690 | 1.3400 |   0.1530   |  0.5960  |      1.587     |  0.9860  |  0.3930
       19 | Denmark |            2 |  7.60   | 1.3830 |   0.2520   |  0.5920  |      1.573     |  0.9960  |  0.4100
       19 | Norway  |            3 |  7.554  | 1.4880 |   0.2710   |  0.6030  |      1.582     |  1.0280  |  0.3410
Connect Apache Superset to PostgreSQL
Apache Superset supports a wide range of source databases, and for PostgreSQL it uses the psycopg2 library. PostgreSQL support is already included in the default Docker setup.
All we need to do is go to the Apache Superset UI, and define a new datasource pointing to our PostgreSQL database:
- Select Data, and then Databases.
- Click the +DATABASE button.
- At the bottom of the modal window, choose Connect this database with a SQLAlchemy URI string instead.
- Insert
demo-pgas DISPLAY NAME (or your own instance name). - Use the PostgreSQL URI as SQLALCHEMY URI. You can find the PostgreSQL URI in Aiven's console, in the service detail view, under the Overview tab.
- Test that all the settings are correct by checking your connection, and making sure you get a nice
Connection looks good!message. - Click ADD to persist our
demo-pgdatabase definition.
Now, it's time to include the happiness table.
- Back in the Apache Superset UI, switch to the Datasets tab.
- Create a table by filling the DATASOURCE with
demo-pg, the SCHEMA withpublicand the table with - no surprises -happiness. - Click ADD to persist the datasource definition.
Ta daaah!
Visualize data
Now we are ready to use our artistic skills, and create visualizations of our data: representing data this way makes it much easier to process.
- Back in the Apache Superset UI, let's navigate to Charts tab.
- Click +CHART.
- In the popup window, select the
public.happinessdataset we created before, and Pivot Table v2 as visualization.
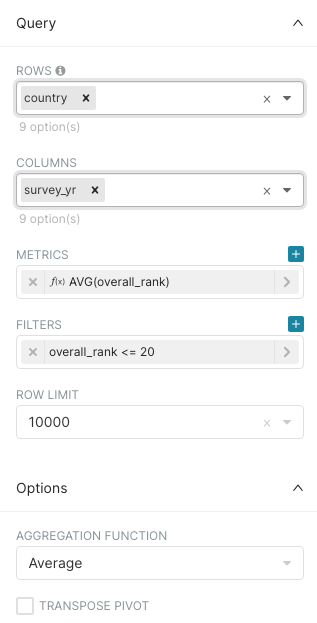
Let's use the dataset, and create a heatmap of the top 10 happiest countries over the years. We can do that with the following configuration:
countryfor the ROWSsurvey_yrfor the COLUMNS- For the METRIC select a SIMPLE calculation based on the
overall_rankcolumn withAVGas aggregated function. - In the FILTERS section, add a SIMPLE filter based on the
overall_rankmetrics being<=to10. - At the bottom, set the AGGREGATION FUNCTION as
Average, this will drive the overall row/column aggregation in the pivot table.
Check out the Query parameters overview:
Now, in the CUSTOMIZE tab set the following options:
- For PIVOT TABLE TYPE select
Table Heatmap - For the ROWS SORT BY select
value ascending - Deselect the SHOW COLS TOTALS
- Name the visualization
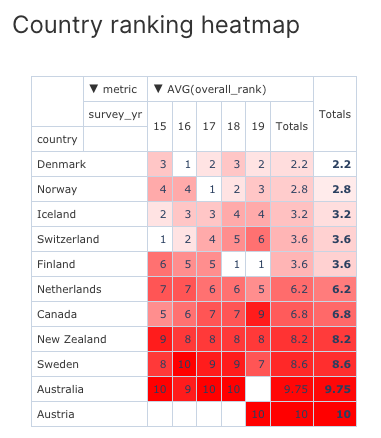
Country ranking heatmap
We're ready to press the RUN button above CUSTOMIZE.
Aaaaand, we end up with a lovely red shaded heatmap showing the countries that made the top 10 at least once in the previous 5 years, ordered by their overall average position.
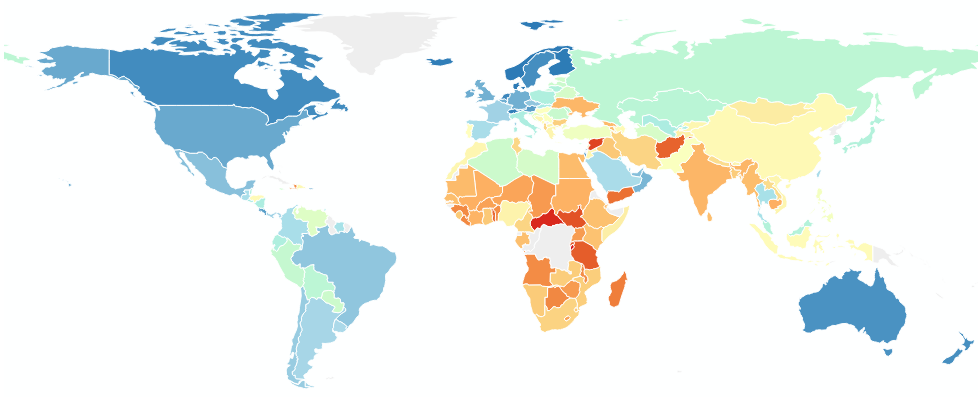
To see where these countries are around the world, the same data could be used to create a map. Try the following settings:
- World Map as visualization type
countryas COUNTRY COLUMNFull Nameas COUNTRY FIELD TYPE- Use a SIMPLE calculation based on the
scorecolumn withAVGaggregation for the METRIC FOR COLOR parameter - Choose the COUNTRY COLOR SCHEME, the screenshot shows
red/yellow/bluebut the choice is yours. Go wild!
The resulting map clearly indicates that a lot of work needs to be done to raise happiness levels in the Southern Hemisphere.
Add calculated fields in the dataset
Sometimes the source dataset doesn't contain all the required fields. This is the case in our example too, with the survey_yr field containing only the last two digits of the year (ie. 18, 19), which means it won't be recognized by Apache Superset as a timestamp, stopping us from using any trend visualization.
Fear not! Apache Superset allows us to change the shape of our dataset, without any modification to the original table, by adding calculated columns.
- In the Apache Superset UI, switch to the Datasets panel.
- Click the Edit pencil icon under the Action section of the happiness dataset.
- Open the CALCULATED COLUMNS tab and create a new item, with the following settings:
*2000+survey_yras SQL EXPRESSION
* LABEL set toYear
*DATETIMEas DATA TYPE
*%Yas DATETIME FORMAT
* Is temporal checkbox selected.
Now the Year column is available, enabling us to create trend visualizations like a linechart of the top 5 positions over time.
Challenge yourself, and try creating this chart yourself as an Apache Superset.
As you'll see, Finland is a pretty happy place - and we think so too!
Wrapping up
A dataset is only useful when stored properly, and made available for queries. It becomes meaningful when insights are discovered and communicated across the company. The combination of PostgreSQL and Apache Superset offers a best-in-class solution for data storage, discovery and visualization, enabling companies to be effective and data-driven.
Some more info:
- Aiven for PostgreSQL: to get your managed PostgreSQL instance
- Apache Superset Documentation: to browse the configuration details
--
Not using Aiven services yet? Sign up now for your free trial at https://console.aiven.io/signup!
In the meantime, make sure you follow our changelog and blog RSS feeds or our LinkedIn and Twitter accounts to stay up-to-date with product and feature-related news.
Stay updated with Aiven
Subscribe for the latest news and insights on open source, Aiven offerings, and more.


